
1. Okwu mmalite
The Surecom SR-629 is a compact and efficient 2-in-1 Duplex Cross Band Radio Repeater Controller designed to enhance the communication capabilities of your handheld walkie-talkies. This device acts as a relay station, allowing two radios to communicate over a greater distance or across different frequency bands. It features a built-in Li-ion battery for extended operation and supports external 5V DC power. The SR-629 is compatible with most popular handheld radios and offers two distinct operating modes to suit various communication needs.
2. Ozi nchekwa
- Ewepụla ngwaọrụ ahụ na oke okpomọkụ, ìhè anyanwụ kpọmkwem, ma ọ bụ mmiri mmiri.
- Use only the provided USB charger cable and a compatible 5V AC adapter.
- Debe ngwaọrụ ahụ ka ọ ghara ịdị n'ọgba eletrik siri ike.
- Ensure proper ventilation when operating for extended periods.
- Agbalịla ịgbasa ma ọ bụ gbanwee ngwaọrụ ahụ. Nye ndị ọrụ ruru eru ọrụ niile.
3. Ihe ngwugwu
Chọpụta na ihe niile dị na ngwugwu gị:
- 1x SR-629 Duplex Repeater Controller
- 2x K1 Plug Cables (for connecting radios)
- 1x Micro USB Cable (for charging)
- 1x USB AC Adapter (100-240V)
- 1 x Akwụkwọ ntuziaka onye ọrụ Bekee

Image: Contents of the SR-629 package, showing the main controller unit, two K1 plug cables, a micro USB charging cable, and the user manual.
4. Ngwaahịa gafereview
The SR-629 controller features a compact design with clearly labeled ports and indicators.

Foto: Zuru ezu view of the SR-629 controller, highlighting the Charger In (Micro USB) port, Mode 1/Off/Mode 2 switch, Radio A Input, Radio B Input, Radio A LED (Green RX / Red TX), and Radio B LED (Green RX / Red TX).
Isi ihe:
- Charger In (Micro USB): Used for charging the internal battery and providing external power.
- Mode 1/Off/Mode 2 Switch: Selects the operating mode or turns the device off.
- Radio A Input: 2-pin K1 port for connecting the first handheld radio.
- Radio B Input: 2-pin K1 port for connecting the second handheld radio.
- Ngosipụta ọnọdụ LED: Two LEDs (one for Radio A, one for Radio B) indicate transmit (Red) and receive (Green) status.
5. Nhazi
Follow these steps to set up your SR-629 repeater controller:
- Chaja ngwaọrụ: Connect the micro USB cable to the 'Charger In' port on the SR-629 and the other end to the USB AC adapter. Plug the adapter into a power outlet. The LED indicators may show charging status.
- Prepare Radios: Ensure your two handheld radios are powered on and set to the desired frequencies. Adjust their volume levels appropriately.
- Connect Radios: Use the provided K1 plug cables to connect your handheld radios to the 'Radio A Input' and 'Radio B Input' ports on the SR-629. Ensure the plugs are fully inserted into the sockets on both the controller and the radios.

Image: Illustration demonstrating the importance of fully inserting the K1 plug cables into the SR-629 controller's ports to ensure proper connection.
- Position Radios: For optimal performance and to minimize interference, place the two connected radios and their antennas at a reasonable distance from each other (e.g., several feet apart).
- Họrọ Ụdị: Use the 'Mode 1/Off/Mode 2' switch to select your desired operating mode (see Section 6 for details).

Image: The SR-629 controller connected via K1 cables to two handheld walkie-talkies, illustrating a typical setup for extending radio communication.
6. .rụ ọrụ
The SR-629 offers two operating modes:
Mode 1: One-Way Relay (A RX → B TX)
In this mode, when Radio A receives a signal, the SR-629 automatically triggers Radio B to transmit that signal. Radio B will not trigger Radio A. This is useful for creating a simple unidirectional repeater link.
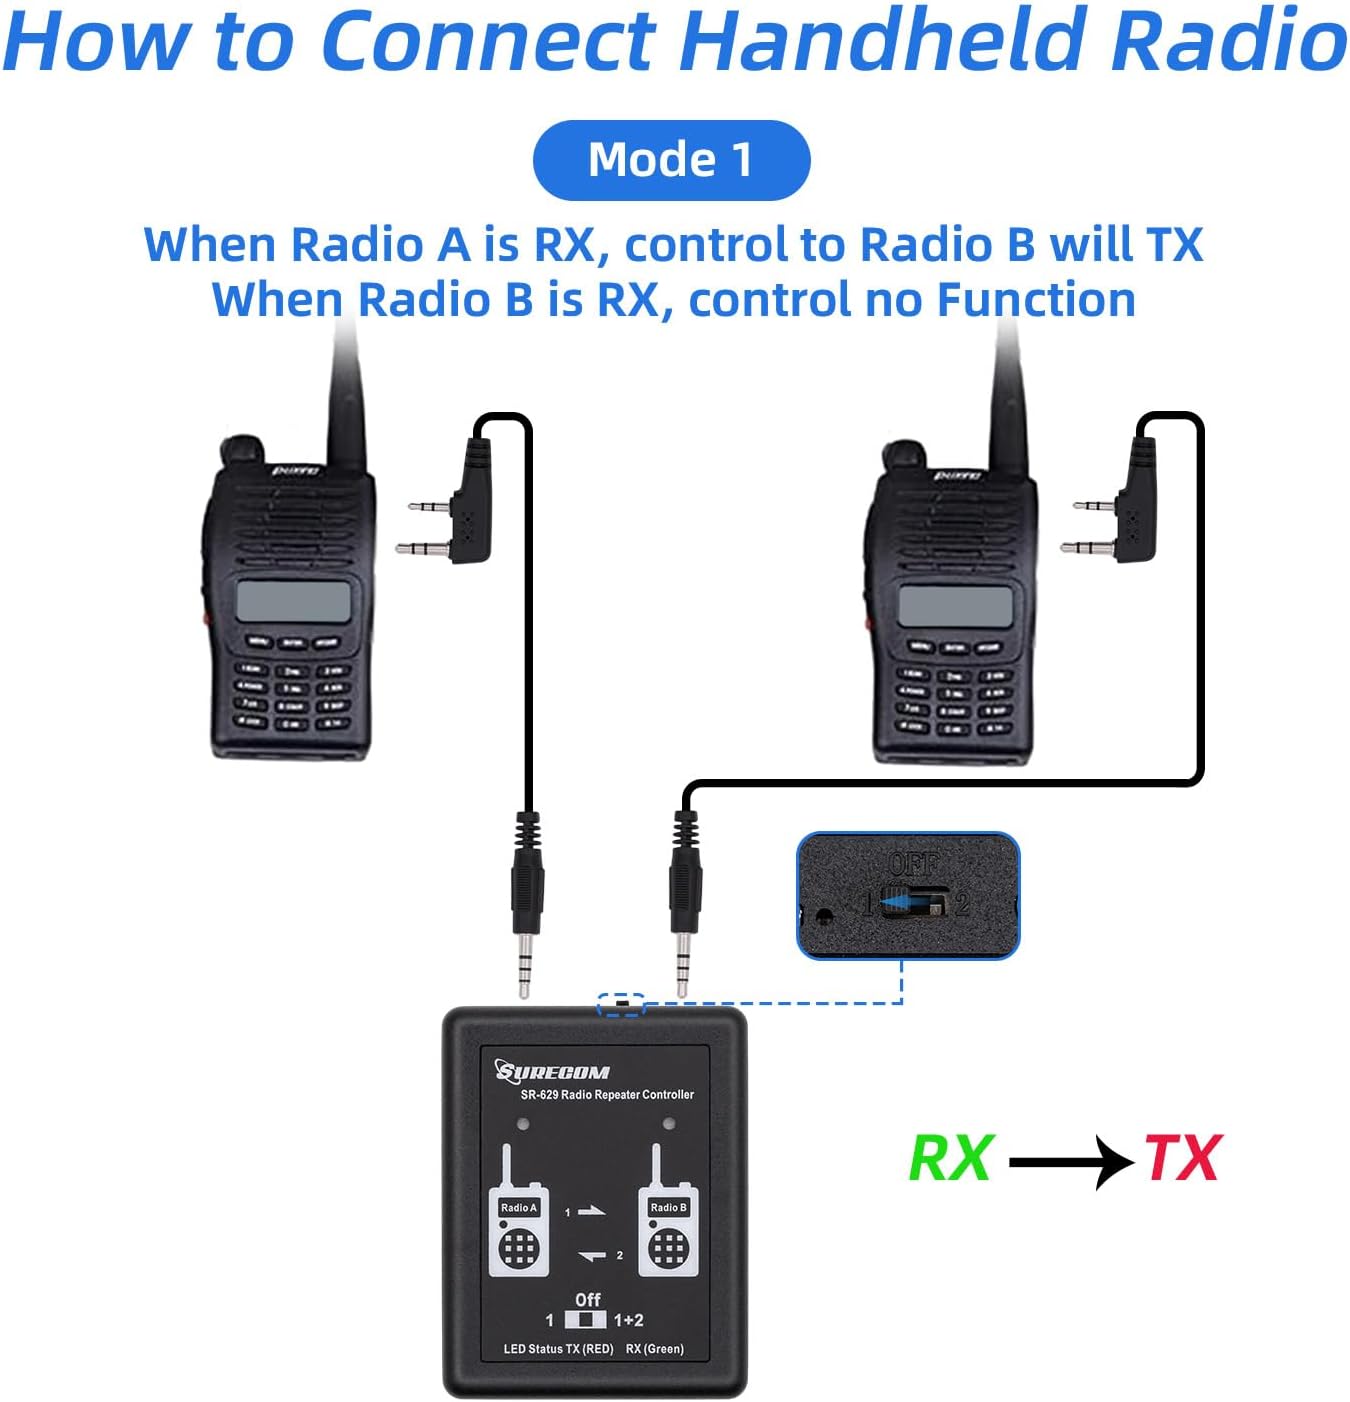
Image: A visual representation of Mode 1, showing audio flow from Radio A (Receive) to Radio B (Transmit) through the SR-629 controller.
Mode 2: Two-Way Relay (A RX → B TX and B RX → A TX)
In this mode, the SR-629 functions as a full duplex repeater. When Radio A receives a signal, Radio B transmits it, and conversely, when Radio B receives a signal, Radio A transmits it. This allows for bidirectional communication between two radios or groups of radios.

Image: A visual representation of Mode 2, showing bidirectional audio flow between Radio A and Radio B through the SR-629 controller, enabling two-way communication.
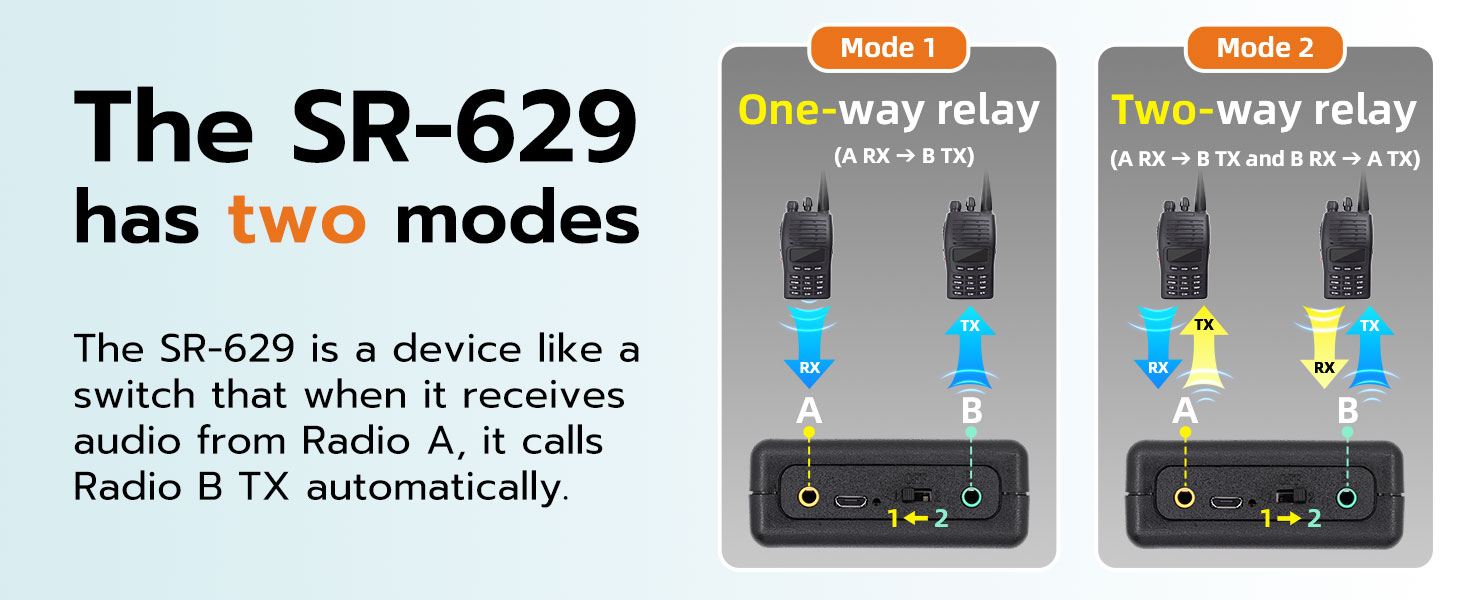
Image: A comparative diagram explaining the two operational modes of the SR-629: Mode 1 for one-way relay (A RX to B TX) and Mode 2 for two-way relay (A RX to B TX and B RX to A TX).
Ihe ngosi LED:
- Green ikanam: Indicates receiving (RX) activity on the corresponding radio.
- Red ikanam: Indicates transmitting (TX) activity on the corresponding radio.
Ndozi olu:
The repeater controller uses voice triggering (VOX) to activate the other party's radio. Proper volume adjustment on the connected radios is crucial for reliable operation. If the volume is too low, the delay may be too short, or the VOX sensitivity is not appropriate, it may result in false triggering (transmitting as soon as receiving) or non-triggering (no response at all). Adjust the volume on your handheld radios until the repeater functions smoothly.
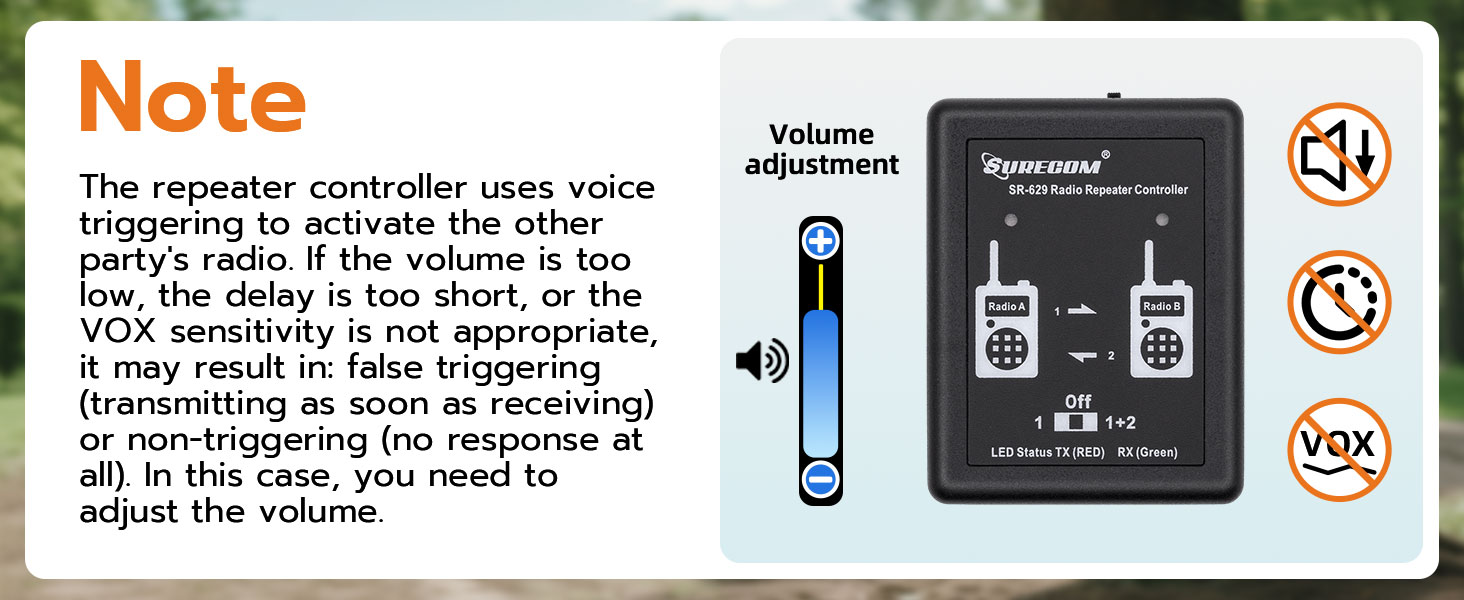
Image: A visual note emphasizing the need for correct volume adjustment on connected radios to ensure proper voice triggering and prevent false or missed transmissions by the SR-629.
DTMF Remote Control Password:
The SR-629 allows users to change the DTMF remote control password directly via a connected radio. Refer to the specific instructions for your handheld radio model on how to input DTMF tones.
7. Nlekọta
- Debe ngwaọrụ ahụ ọcha na enweghị ntụ. Jiri akwa dị nro, kpọrọ nkụ maka nhicha.
- Chekwaa ngwaọrụ ahụ n'ebe dị jụụ, kpọrọ nkụ mgbe ọ naghị eji ya.
- Zere idobe ma ọ bụ idobe ngwaọrụ ahụ na mmetụta siri ike.
- Regularly check the connection cables for any signs of wear or damage.
8. Nchọpụta nsogbu
- No Repeater Functionality:
- Ensure the SR-629 is powered on and the mode switch is set to '1' or '2'.
- Check that both K1 cables are fully inserted into the SR-629 and the radios.
- Verify that the radios are powered on and set to appropriate frequencies.
- Adjust the volume on the handheld radios. Insufficient volume can prevent VOX triggering.
- False Triggering or Constant Transmission:
- The volume on the receiving radio might be too high, causing the SR-629 to constantly detect audio. Reduce the volume.
- Ensure the radios are not too close to each other, which can cause feedback or interference.
- Poor Audio Quality or Static:
- Lelee njikọ eriri maka ikesa ma ọ bụ mmebi.
- Ensure radios are properly tuned and have good signal strength.
- Increase the physical separation between the two radios and their antennas to reduce desensitization.
- Ndụ obere batrị:
- Gbaa mbọ hụ na chajịla ngwaọrụ ahụ nke ọma tupu ejiri ya.
- If operating for extended periods, consider using the external 5V DC power supply.
9. Nkọwapụta
| Njirimara | Nkọwapụta |
|---|---|
| Nọmba nlereanya | SR-629 |
| Akụkụ ngwaahịa | 7.48 x 4.72 x 1.97 sentimita (19 x 12 x 5 cm) |
| Ibu Ibu | 3.17 ounce (90 grams) |
| Ịnye ọkụ | Built-in Li-ion battery, External DC 5V |
| Ndụ batrị | Up to 72 hours (typical) |
| Ọnụọgụ nke ọwa | 1 (for repeater control) |
| Atụmatụ pụrụ iche | Two mode select, Multi-LED display, DTMF remote control password change |
| Gụnyere Cable | 2 x K1 plug Cable, 1 x USB charger cable |
10. Akwụkwọ ikike na nkwado
Surecom products are manufactured to high-quality standards. For warranty information and technical support, please refer to the documentation provided with your purchase or visit the official Surecom websaịtị. Debe ihe akaebe nke ịzụrụ maka akwụkwọ ikike.


