
Okwu mmalite
The Aetertek AT-919C is a remote dog training system designed for effective communication and training of medium to large dogs. This system can be configured for one or two dogs, offering various correction modes including vibration, sound, and static stimulation. Its waterproof receiver collar and long remote range make it suitable for both home use and outdoor training environments.
Atụmatụ gụnyere:
- Configurable for 1-dog or 2-dog training (with additional collar).
- Independent use of vibration, sound, and static stimulation.
- Integrated Auto Anti-Bark function (can be turned on/off).
- LCD display on transmitter showing correction levels and dog channel.
- 10 levels of progressive static stimulation and 10 levels of adjustable sound.
- Strong level vibration.
- Rechargeable, 100% waterproof, and submersible receiver collar.
- Remote range up to 1100 yards (approx. 1000 meters), capable of passing through obstacles.
- Transmitter includes a flashlight feature and belt clip.
Ihe ngwugwu
Upon opening your Aetertek AT-919C training system, please verify that all components listed below are present:
- Ihe nfefe dị anya
- 2 x Collar Receivers (with built-in rechargeable batteries)
- Charger with US plug
- 2 x High-quality adjustable PU Dog Collar Straps
- Nwalee bọlbụ
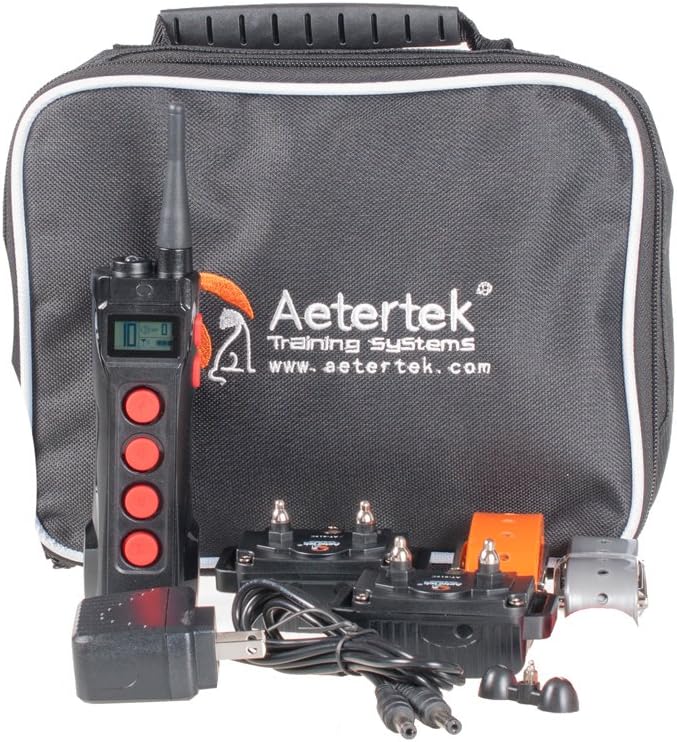
Image: Complete Aetertek AT-919C training system components, including the remote transmitter, two collar receivers, charger, and a black carrying bag.

Image: The included USB charger with a US plug and the dual charging cable for simultaneously charging both collar receivers.
Ntuziaka nhazi
1. Ịchaji ngwaọrụ
Before initial use, fully charge both the remote transmitter and the collar receivers. Use the provided charger and cable. The charging ports are typically covered by a rubber flap to ensure waterproofing on the receiver.
- Jikọọ chaja na nkwụnye ọkụ.
- Plug the charging cable into the charging port of the transmitter and each receiver.
- Allow devices to charge until the indicator light signals a full charge (refer to specific light indicators in the operating section if available on device).
2. Attaching the Collar Receiver
Proper fit of the collar receiver is crucial for effective and humane training. The contact points must touch the dog's skin.
- Thread the adjustable PU dog collar strap through the receiver unit.
- Place the collar around your dog's neck, ensuring the contact points are positioned underneath the neck.
- Adjust the strap snugly. You should be able to fit one or two fingers comfortably between the strap and your dog's neck. The collar should not be too loose, as this can cause inconsistent contact and irritation from rubbing.
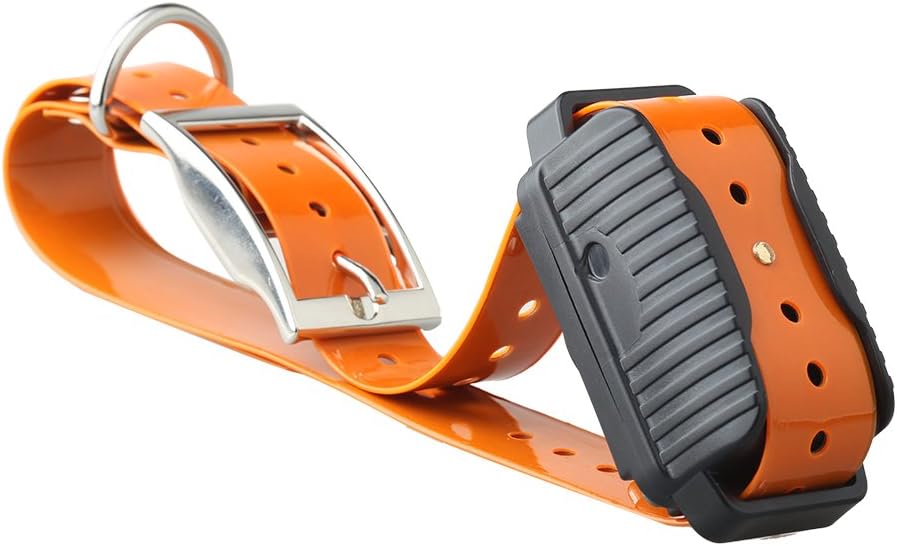
Image: The waterproof collar receiver attached to an orange PU strap, ready for fitting on a dog.

Foto: N'okpuru view of the collar receiver, highlighting the two metal contact points that deliver stimulation.
3. Pairing Transmitter and Receiver(s)
The system allows for training one or two dogs. Each receiver must be paired to a specific channel on the transmitter.
- Turn on the transmitter and the receiver(s).
- On the transmitter, use the "One button to change dog mode" (often labeled '1/2' or similar) to select the desired dog channel (Dog 1 or Dog 2).
- Follow the specific pairing instructions in your device's quick start guide, which usually involves holding a button on the receiver while the transmitter is in pairing mode. Note: Some users report that collars may unsync after charging, requiring re-pairing.
4. Nyochaa Sistemu
Before using on your dog, test the functions of the collar.
- Ụda na ịma jijiji: With the receiver on, press the sound or vibration buttons on the transmitter. You should hear a beep or feel the receiver vibrate.
- Mkpali kwụ ọtọ: Use the provided test bulb. Place the test bulb's wires across the two contact points on the receiver. Select a low static stimulation level on the transmitter and press the static stimulation button. The test bulb should light up, indicating the static function is working.
Ntuziaka ọrụ
Nyefee gafereview

Foto: N'ihu view of the Aetertek AT-919C remote transmitter, showing the LCD screen and control buttons.

Foto: Akụkụ view of the Aetertek AT-919C remote transmitter, highlighting the belt clip for portability.

Foto: N'okpuru view of the Aetertek AT-919C remote transmitter, showing the integrated flashlight and model number.

Image: The Aetertek AT-919C remote transmitter with its built-in flashlight activated, providing illumination.
Ụdị mmezi
The AT-919C offers three distinct correction modes:
- Sound (Beep): Delivers an audible tone from the receiver. This is often used as a warning or for positive reinforcement. There are 10 adjustable levels for the number of beeps.
- Mmaji: Causes the receiver to vibrate. This can be used as a gentle reminder or a precursor to static stimulation. The system features a strong level of vibration.
- Static Stimulation (Shock): Delivers a static pulse. This mode has 10 progressive levels, adjustable in both intensity and duration, allowing for precise control based on your dog's temperament and the training situation.
Using the Remote Transmitter
- Gbanyụọ/ Gbanyụọ: Press and hold the power button to turn the transmitter on or off.
- Dog Channel Selection: Use the dedicated button (e.g., '1/2' or 'Dog Mode') to switch between Dog 1 and Dog 2 channels if training multiple dogs. The selected channel will be displayed on the LCD.
- Ọkwa mmezi: Use the up/down arrow buttons (often on the side or near the LCD) to adjust the intensity level for static stimulation or the number of beeps for sound. The current level will be shown on the LCD.
- Activating Corrections: Press the corresponding button for Sound, Vibration, or Static Stimulation to deliver the chosen correction to the active dog channel.
- Igwe ọkụ: The transmitter includes a flashlight feature for use in low-light conditions. Activate it using its dedicated button.
- Auto Anti-Bark Function: The system has an auto anti-bark function that can be toggled on or off. Refer to your device's specific instructions for enabling/disabling this feature.
Effective Training Tips
- Start with the lowest effective level for static stimulation and gradually increase if necessary.
- Use corrections consistently and immediately after the undesirable behavior.
- Combine corrections with verbal commands and positive reinforcement.
- Never use the collar for punishment or aggression. It is a training tool to aid communication.
- Limit the duration of static stimulation to avoid over-correction.
- Do not leave the collar on your dog for extended periods (more than 12 hours) to prevent pressure necrosis.
Nlekọta
Proper maintenance ensures the longevity and optimal performance of your Aetertek AT-919C training system.
- Nhicha: Clean the collar receiver and transmitter with water as needed. Ensure charging ports are sealed before cleaning the receiver. Use a soft cloth to wipe down surfaces.
- Nlekọta batrị: The devices use Lithium Ion batteries. Handle them with care. Avoid extreme temperatures. Do not attempt to disassemble the battery packs. Recharge when the battery indicator is low to maintain battery health.
- Ebe ana-akpọtụrụ: Regularly inspect the contact points on the receiver for dirt or corrosion. Clean them gently if necessary. Ensure they are securely attached.
- Nyocha eriri: Check the PU collar strap for any signs of wear, tears, or damage. Replace if necessary to ensure secure fit.
- Nchekwa: When not in use for extended periods, store the system in a cool, dry place. Ensure devices are fully charged before long-term storage to prevent battery degradation.
Nchọpụta nsogbu
| Nsogbu | Ihe nwere ike ime | Ngwọta |
|---|---|---|
| Receiver not responding to transmitter. | Low battery on receiver or transmitter; Receiver not paired or unsynced; Out of range. | Charge both devices fully. Re-pair the receiver with the transmitter (refer to Setup Guide). Ensure you are within the 1100-yard range. |
| Inconsistent or no static stimulation. | Poor contact with dog's skin; Collar too loose; Contact points dirty or damaged. | Adjust collar for a snug fit, ensuring contact points touch the skin. Clean contact points. Ensure dog's fur is not interfering. |
| Anti-bark function triggers without barking or doesn't trigger with barking. | Sensitivity setting too high/low; External noises; Collar movement. | Adjust the anti-bark sensitivity if possible (check device manual). Ensure collar is snug. Test in a quiet environment. |
| Batrị na-agbapụ ngwa ngwa. | Aging battery; Frequent use; Not fully charged. | Ensure devices are fully charged before use. If battery life significantly degrades, consider contacting support for battery replacement options. |
| Remote range is shorter than advertised. | Environmental interference (buildings, dense foliage); Low battery. | Ensure devices are fully charged. Test in an open area. Obstacles like walls and fences can reduce effective range. |
Nkọwapụta ngwaahịa
- Ụdị: AT-919C
- Akara: Aetertek
- Ibu ihe: 1.2 pound (ihe dị ka 0.54 n'arọ)
- Akụkụ ngwugwu: 9.2 x 8 x 1.7 sentimita (ihe dịka 23.4 x 20.3 x 4.3 cm)
- Batrị: 3 batrị lithium ion achọrọ (gụnyere)
- Ihe: Rubber (for collar strap)
- Ndị na-ege ntị ebumnuche: Dogs (medium to large breeds recommended)
- Ebe dị anya: Ruo yaadị 1100 (ihe dị ka mita 1000)
- Ọkwa mgbazi: 10 levels of static stimulation, 10 levels of sound
- Ngosipụta mmiri anaghị anabata onye nnata: 100% Waterproof and Submersible
- Onye nrụpụta: Aetertek
- Ụbọchị mbụ dị: Eprel 6, 2016
Ozi akwụkwọ ikike
The Aetertek AT-919C Electronic Dog Training System comes with a 1-afọ akwụkwọ ikike from the date of purchase. This warranty covers manufacturing defects and malfunctions under normal use. It does not cover damage caused by misuse, accidents, unauthorized modifications, or normal wear and tear.
For warranty claims or inquiries, please retain your proof of purchase and contact the manufacturer or authorized seller.
Nkwado ndị ahịa
Should you encounter any issues not covered in this manual or require further assistance with your Aetertek AT-919C training system, please contact the manufacturer, Aetertek, or the retailer from whom you purchased the product. Refer to your product packaging or the seller's information for specific contact details.
When contacting support, please be prepared to provide your product model (AT-919C) and a detailed description of the issue.