
1. Ntuziaka nchekwa dị mkpa
Mgbe ị na-eji ngwa eletriki, ekwesịrị ịgbaso ihe nchekwa nchekwa bụ isi, gụnyere ihe ndị a:
- Gụọ ntuziaka niile tupu i jiri ngwa.
- Anwala iji ọkụ ọkụ a meghere ụzọ n'ihi na nke a nwere ike ịkpata mmerụ ahụ na ike microwave.
- Edokwala ihe ọ bụla n'etiti ihu oven na ọnụ ụzọ ma ọ bụ kwe ka ala ma ọ bụ ihe fọdụrụ dị ọcha kwakọba n'elu ebe mkpuchi.
- Ejila oven rụọ ọrụ ma ọ bụrụ na ọ mebiri emebi. Ọ dị mkpa karịsịa na ọnụ ụzọ oven na-emechi nke ọma nakwa na ọ dịghị mmebi nke: (1) ọnụ ụzọ (ehulata), (2) hinges na latches (agbajikwa ma ọ bụ tọpụ), (3) ọnụ ụzọ na-ekpuchi elu.
- Onye ọ bụla ekwesịghị ịgbanwe ma ọ bụ rụzie oven ma ewezuga ndị ọrụ ruru eru nke ọma.
- Gbaa mbọ hụ na etinyere ngwaọrụ ahụ nke ọma.
- Ejila eriri ma ọ bụ gbanye na mmiri.
- Nleba anya dị mkpa mgbe ụmụaka na-eji ngwa ma ọ bụ nso ụmụaka.
- Ejila oven ahụ mee ihe ndị ọzọ ma e wezụga ikpo ọkụ nri.
2. Ngwaahịa gafereview
2.1. Microwave Oven Components

Foto 1: N'ihu view of the Sharp R-369T Microwave Oven, showcasing its 33L capacity, 6 microwave power levels, and various cooking functions.
The Sharp R-369T is a 33-liter solo microwave oven designed for efficient food preparation. It features a sleek silver finish and a black glass door. Key components include the oven cavity, glass turntable, control panel, and door with a push-open mechanism.

Ọgụgụ 2: Ime view of the microwave oven, showing the spacious 33L cavity and the removable glass turntable for even cooking.
The interior includes a 272mm glass turntable that rotates during operation to ensure food is heated evenly. The oven door opens with a simple push mechanism.
2.2. Ogwe njikwa
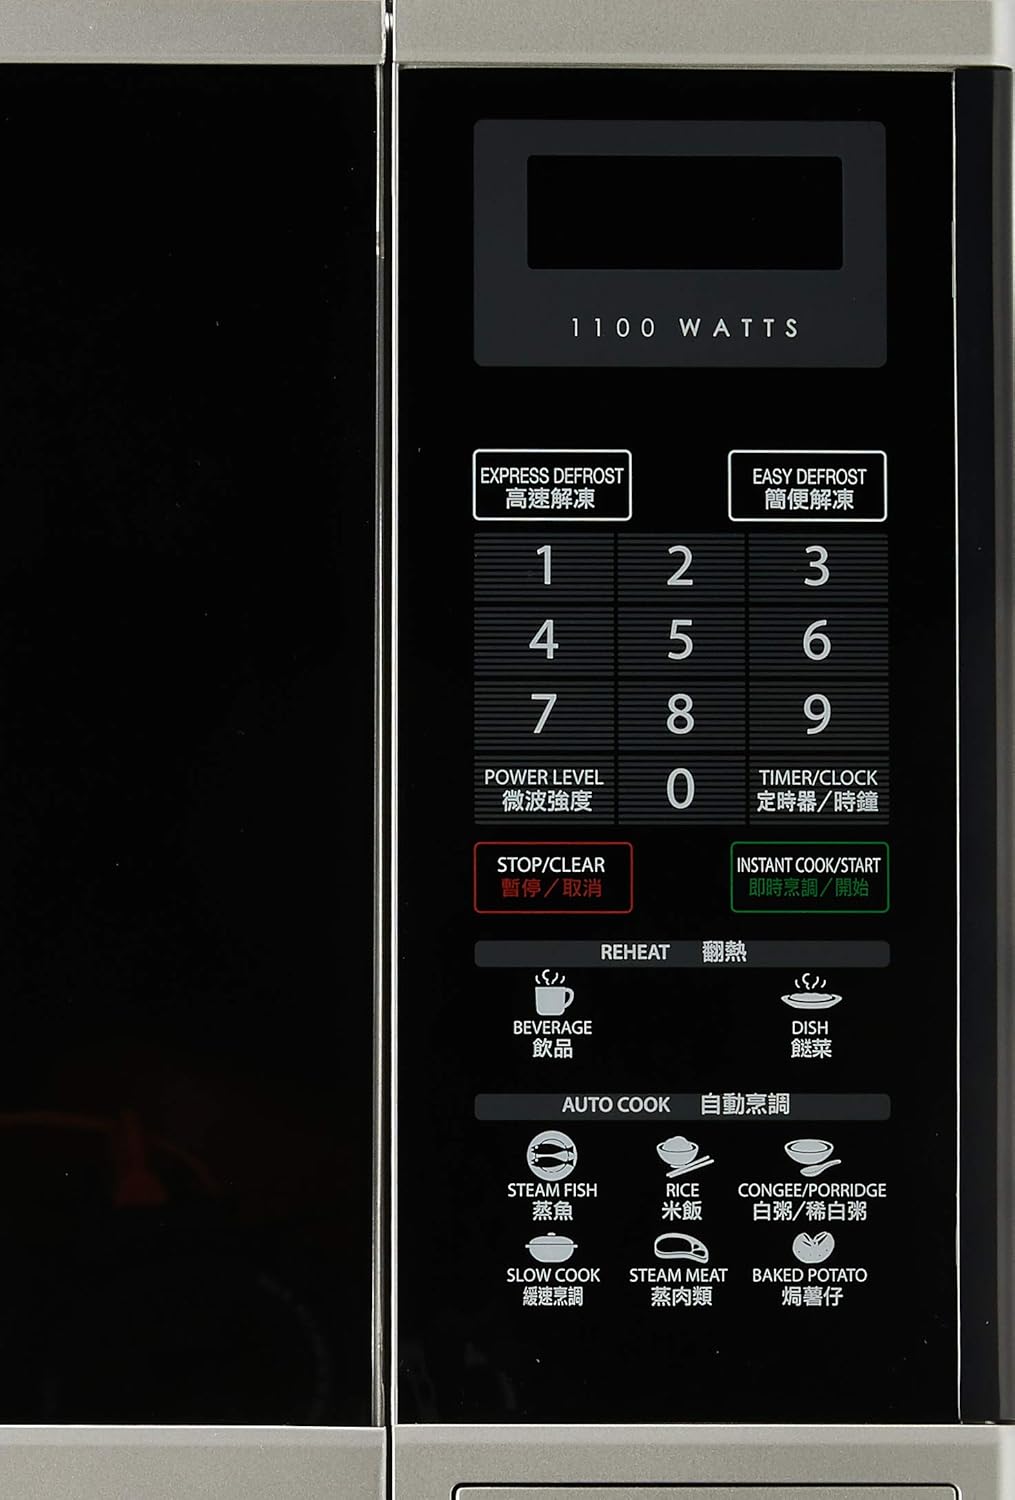
Ọgụgụ 3: Zuru ezu view of the control panel, featuring numerical keys, function buttons, and the digital display.
The control panel is located on the right side of the oven and features a digital display, numerical keypad (0-9), and various function buttons:
- EXPRESS DEFROST / EASY DEFROST: For quick and convenient defrosting.
- Ọkwa IKE: Adjusts microwave power output.
- Oge/elekere: Sets the cooking timer or the current time.
- Kwụsị/ Kwụchaa: Stops current operation or clears settings.
- INSTANT COOK/START: Starts cooking immediately or confirms settings.
- Chegharịa: Dedicated buttons for reheating beverages and dishes.
- AUTO COOK: Pre-programmed settings for various food types like Steam Fish, Rice, Congee/Porridge, Slow Cook, Steam Meat, and Baked Potato.
3. Ntọala na nwụnye
3.1. Iwepu ngwongwo
Carefully remove the microwave oven and all packing materials from the carton. Check the oven for any damage, such as dents or a misaligned door. Do not operate the oven if it is damaged. Contact your dealer or authorized service center.
3.2. Ntinye
- Place the oven on a flat, stable surface strong enough to hold its weight (approximately 17kg).
- Ensure adequate ventilation. Leave a minimum of 10 cm (4 inches) clearance at the rear, 20 cm (8 inches) at the top, and 5 cm (2 inches) on each side for proper airflow.
- Akwụsịla ikuku ikuku.
- Debe oven ahụ ka ọ ghara iru ebe okpomọkụ, uzuoku, ma ọ bụ mmiri mmiri na-agbapụta.
- Do not place the oven near a radio or TV, as it may cause interference.
3.3. Njikọ Ọdụdọ

Ọgụgụ 4: N'azụ view of the microwave oven, illustrating the power cord connection and important safety warnings regarding microwave energy.
- Plug the oven into a properly grounded 220V, 50Hz AC outlet with a dedicated circuit.
- Ejila eriri ndọtị ma ọ bụ ihe nkwụnye ọkụ.
- Hụ na eriri ọkụ eletrik ahụ emebighị ma ọ bụ kpọchie ya.
4. Ntuziaka ọrụ
4.1. Ịtọ elekere
- Pịa ỌGỤGỤ/ECHICHE bọtịnụ otu ugboro.
- Use the numerical keypad to enter the current time (e.g., 12:30 for 12:30 PM).
- Pịa ỌGỤGỤ/ECHICHE bọtịnụ ọzọ iji gosi.
4.2. Isi nri Microwave
- Tinye nri n'ime ngwa ngwa ngwa ngwa ndakwa nri n'elu igwe ntụgharị iko.
- Mechie ọnụ ụzọ oven nke ọma.
- Pịa Ọkwa IKE button repeatedly to select the desired power level (e.g., P100 for 100% power, P80 for 80% power). The oven offers 6 microwave power levels.
- Use the numerical keypad to enter the cooking time.
- Pịa INSTANT COOK/START malite isi nri.
4.3. Ikpochapu mmiri
The oven offers two defrost functions:
- EXPRESS DEFROST: For quick defrosting of smaller items. Follow on-screen prompts or manual for specific weight settings.
- EASY DEFROST: For more controlled defrosting. Refer to the manual for weight and food type guidelines.
- Tinye nri oyi kpọnwụrụ na turntable.
- Pịa nke ọ bụla NKWUKWU OKWU or EASY DEFROST.
- Enter the weight of the food using the numerical keypad.
- Pịa INSTANT COOK/START.
4.4. Reheat Functions
The oven includes 2 Reheat Menu keys for common items:
- BEVERAGE: For reheating drinks.
- DISH: For reheating prepared meals.
- Place the item to be reheated on the turntable.
- Pịa nke dabara adaba MALITE button (BEVERAGE or DISH).
- The oven will automatically set the time. Press INSTANT COOK/START ibido.
4.5. Auto Cook Functions
Nke CLỌ AKW .KWỌ menu provides pre-programmed settings for various foods:
- Azụ Ụzụ
- Osikapa
- CONGEE/PORRIDGE
- JIRA AJ CTA
- Anụ uzuoku
- Nduku esiri esi
- Place the food in a suitable container on the turntable.
- Pịa ihe achọrọ CLỌ AKW .KWỌ bọtịnụ.
- Select the quantity or weight if prompted (refer to the full manual for specific auto cook settings).
- Pịa INSTANT COOK/START.
5. Nlekọta na nhicha
Ịsacha oven microwave gị mgbe niile ga-eme ka o sie ike ma rụọ ọrụ nke ọma.
5.1. Mpụga ihicha
- Jiri nwayọ hichaa elu mpụta, damp akwa .
- Ejila ihe nchacha abrasive ma ọ bụ kemịkalụ siri ike.
5.2. Nhicha ime ụlọ
- Clean the oven cavity after each use with a mild detergent and a soft cloth.
- Maka nri siri ike, tinye otu efere mmiri na mpekere lemon n'ime ya ma tinye ya na microwave ruo nkeji ise ruo iri. Uzuoku ahụ ga-eme ka ihe fọdụrụ dị nro, mee ka ọ dịrị mfe ihicha ya.
- Hụ na ihe mkpuchi ọnụ ụzọ na ihe mkpuchi ahụ dị ọcha iji mee ka ọ rụọ ọrụ nke ọma.
5.3. Glass Turntable
- Enwere ike iwepụ ihe e ji atụgharị iko na ihe e ji atụgharị ihe maka ihicha ya.
- Sachaa ha na mmiri ọkụ, ncha ma ọ bụ n'ime efere efere.
- Gbaa mbọ hụ na akpọọla ha kpamkpam tupu etinyeghachi ha na oven.
6. Nchọpụta nsogbu
Tupu ịkpọtụrụ ọrụ, lelee nsogbu ndị a na-ahụkarị:
| Nsogbu | Ihe nwere ike ime | Ngwọta |
|---|---|---|
| Igwe ọkụ anaghị ebido | Agbanyeghi eriri ike; A naghị emechi ọnụ ụzọ nke ọma; Fiusi fụrụ ma ọ bụ ihe mgbaji sekit kwụsịrị. | Plug in power cord; Close door securely; Check fuse or reset circuit breaker. |
| Nri abụghị kpo oku | Oge esi nri ma ọ bụ ọkwa ike adịghị mma; Emechighị ụzọ nke ọma. | Adjust time/power; Ensure door is latched. |
| Turntable anaghị atụgharị | Turntable adịghị ọdụ nke ọma; Ihe mgbochi n'okpuru turntable. | Reposition turntable and roller ring; Remove any obstructions. |
| Na-ekpo ọkụ n'ime oven | Metal or foil in oven; Food splatters. | Remove metal objects; Clean oven interior thoroughly. |
If the problem persists after checking these points, please contact an authorized service technician.
7. Nkọwapụta
| Ụdị | Nkọ |
| Nlereanya | R-369T |
| Ike | 33 lita |
| Ike mmepụta | 800W (Microwave) |
| Wattage | 1100 watts (Input) |
| Dayameta ntụgharị | 272mm |
| Akụkụ ndị dị n'èzí (W x H x D) | 520 x 310 x 448 mm |
| Ibu | 16.96 n'arọ |
| Voltage | 220 volts |
| Ugboro ugboro | 50 Hz |
| Ihe onwunwe | Igwe igwe |
| Atụmatụ pụrụ iche | Programmable, 6 Microwave Power Levels, 2 Reheat Menu Keys, Easy Defrost, Slow Cook Key, Black Glass Door |

Figure 5: Dimensional drawing of the Sharp R-369T Microwave Oven, illustrating its width (520 mm / 52 cm), height (310 mm / 31 cm), and depth (448 mm / 44.8 cm).
8. Akwụkwọ ikike na nkwado
For warranty information and customer support, please refer to the warranty card included with your product or visit the official Sharp website for your region. Keep your purchase receipt as proof of purchase for any warranty claims.
For technical assistance or service inquiries, please contact Sharp customer service.