Okwu mmalite
This manual provides essential information for the safe operation, maintenance, and care of your Hyper Tough 2.4A Orbit Sander, Model 2112. Please read and understand all instructions before using the product to ensure proper function and to prevent injury.
The Hyper Tough 2.4A Orbit Sander is designed for dry sanding on painted surfaces, wood, plastic, and metal. It is suitable for smoothing rough surfaces, removing old finishes, and preparing surfaces for new paint or other finishes.
Ozi nchekwa izugbe
ỊDỌ AKA NA NTỊ: Gụọ ịdọ aka ná ntị nchekwa, ntụziaka, nkọwa na nkọwapụta enyere na ngwa ike a. Ọdịda ịgbaso ntuziaka niile edepụtara n'okpuru nwere ike bute ujo ọkụ eletrik, ọkụ na/ma ọ bụ mmerụ ahụ dị egwu.
Nchekwa Mpaghara Ọrụ
- Debe ebe a na-arụ ọrụ ọcha na ọkụ nke ọma. Ebe mgbagwoju anya ma ọ bụ ọchịchịrị na-akpọ ihe mberede.
- Ejila ngwaọrụ ike rụọ ọrụ n'ime ikuku mgbawa, dị ka n'ihu mmiri ọkụ, gas, ma ọ bụ uzuzu. Ngwá ọrụ ike na-emepụta ọkụ ọkụ nke nwere ike ịgbanye uzuzu ma ọ bụ uzuoku.
- Chebe ụmụaka na ndị na-ekiri ebe ha na-arụ ọrụ ike. Ihe ndọpụ uche nwere ike ime ka ị kwụsị ịchịkwa.
Nchekwa eletriki
- Plọg ngwaọrụ ike ga-adabarịrị na mpụta. Agbanwela plọg ahụ n'ụzọ ọ bụla.
- Zenarị mmetụ ahụ n'elu ala ala ma ọ bụ n'ala, dị ka ọkpọkọ, radiators, ranges, na friji. Enwere nnukwu ihe ize ndụ nke ujo eletrik ma ọ bụrụ na ahụ gị agbaala n'ala ma ọ bụ gbatuo.
- Ewepụla ngwaọrụ ike na mmiri ozuzo ma ọ bụ ọnọdụ mmiri. Mmiri na-abanye n'ime ngwá ọrụ ọkụ ga-eme ka ihe ize ndụ nke ujo eletrik dịkwuo elu.
- Ejila ụdọ mee ihe n'ụzọ na-ezighị ezi. Ejila eriri ahụ maka ibu, ịdọrọ, ma ọ bụ ịtọpụ ngwaọrụ ike. Debe eriri ka ọ ghara ikpo ọkụ, mmanụ, akụkụ dị nkọ ma ọ bụ akụkụ na-akpụ akpụ. Ụdọ ndị mebiri emebi ma ọ bụ kekọtara ọnụ na-abawanye ohere nke ujo eletrik.
Nchekwa nkeonwe
- Yiri nchebe anya mgbe niile. Jiri ugogbe anya nchekwa ma ọ bụ enyo anya.
- Wear appropriate personal protective equipment such as a dust mask, non-skid safety shoes, hard hat, or hearing protection for appropriate conditions.
- Emechala oke. Debe ụkwụ kwesịrị ekwesị na nguzozi mgbe niile. Nke a na-enyere aka ịchịkwa ngwá ọrụ ike ka mma na ọnọdụ ndị a na-atụghị anya ya.
- Yi uwe nke ọma. Ejila uwe na-adịghị mma ma ọ bụ ọla. Debe ntutu gị na uwe gị ka ọ ghara imegharị akụkụ ahụ. Enwere ike ijide uwe ndị rụrụ arụ, ọla ma ọ bụ ogologo ntutu n'akụkụ ndị na-akpụ akpụ.
Ngwaahịa gafereview
Familiarize yourself with the components of your Hyper Tough 2.4A Orbit Sander before operation.
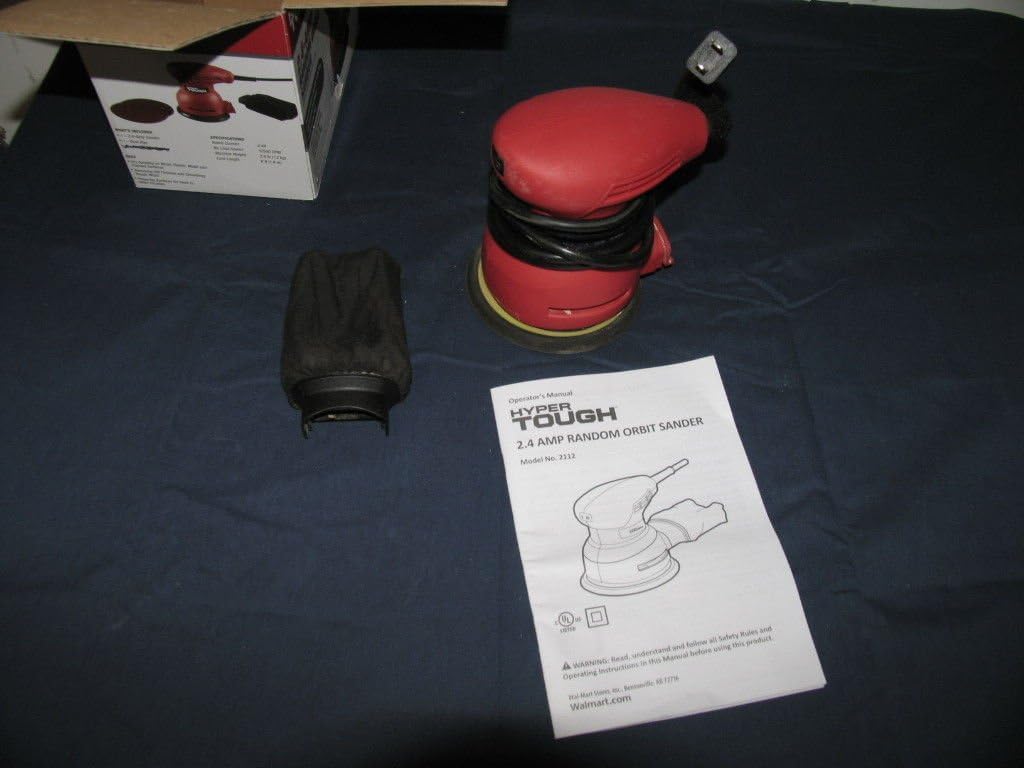
Foto 1: Hyper Tough 2.4A Orbit Sander with accessories and manual.

Foto 2: Underside of the sander with dust bag attached.
Isi ihe:
- Ihe mkpuchi aja: Hook-and-loop system for quick sandpaper changes.
- Akpa nchịkọta uzuzu: Attaches to the sander for dust extraction.
- Mgbanwu ma ọ bụ gbanyụọ: Sealed to prevent dust ingress.
- eriri ike: 6-foot length for extended reach.
Melite
Na-agbakwunye akwụkwọ aja
- Hụ na e wepụrụ sander ahụ na isi iyi ike.
- Select the appropriate grit sandpaper for your task. The sander uses hook-and-loop sandpaper.
- Align the holes on the sandpaper with the holes on the sanding pad to ensure proper dust extraction.
- Press the sandpaper firmly onto the sanding pad, ensuring it is securely attached across the entire surface.
Na-agbakwunye akpa nchịkọta uzuzu
- Hụ na ewepụghị sander ahụ.
- Locate the dust extraction port on the sander.
- Slide the dust collection bag onto the port until it is firmly seated. Ensure a tight fit to maximize dust collection efficiency.
Ntuziaka ọrụ
Tupu arụ ọrụ
- Always wear safety glasses and a dust mask.
- Gbaa mbọ hụ na workpiece na-echekwara clamped ma ọ bụ jide ya iji gbochie mmegharị n'oge sanding.
- Check that the sandpaper is correctly attached and the dust bag is securely in place.
- Tinye sander n'ime oghere ọkụ kwesịrị ekwesị.
Sanding Procedure
- Jiri aka abụọ jide sander ike.
- Debe ihe mkpuchi ájá ahụ n'elu ihe eji arụ ọrụ tupu ị gbanye ngwaọrụ ahụ.
- Press the On/Off switch to start the sander.
- Move the sander slowly and evenly over the surface in overlapping circular or linear patterns. Avoid applying excessive pressure; the weight of the tool is usually sufficient.
- Keep the sander moving to prevent gouging or creating swirl marks. The mechanical pad brake helps reduce free-spin to minimize gouging.
- When finished, lift the sander from the workpiece before turning it off.
- Press the On/Off switch to turn the sander off.
- Unplug the sander from the power source after use.
Mara: For best results, start with a coarser grit sandpaper to remove material quickly, then switch to finer grits for a smoother finish.
Nlekọta
Nhicha
- Always unplug the sander before cleaning.
- Wipe the exterior of the tool with a clean, damp akwa . Ejila kemịkalụ siri ike ma ọ bụ ihe mkpocha abrasive.
- Periodically clean the ventilation openings to prevent overheating. Use compressed air if available.
Akpa nchịkọta uzuzu
- Empty the dust collection bag frequently, especially when sanding fine dust. A full bag reduces dust extraction efficiency.
- To empty, remove the bag from the sander and shake out the dust.
- Clean the inside of the bag periodically to ensure optimal airflow.
Sanding Kedo akwa
- Inspect the sanding pad regularly for wear or damage. Replace if necessary to maintain sanding performance.
- Ensure the hook-and-loop surface is clean and free of debris for proper sandpaper adhesion.
Nchọpụta nsogbu
| Nsogbu | Ihe nwere ike ime | Ngwọta |
|---|---|---|
| Sander anaghị amalite. | Enweghị ọkụ. Mgbanwe na-ezighi ezi. | Lelee eriri ọkụ na ọpụpụ. Contact customer support for switch replacement. |
| Nchịkọta uzuzu na-adịghị mma. | Dust bag full or improperly attached. Sandpaper holes not aligned. | Empty and reattach dust bag securely. Ensure sandpaper holes align with pad holes. |
| Oke ịma jijiji ma ọ bụ mkpọtụ. | Damaged sanding pad. Loose sandpaper. | Inspect and replace sanding pad if damaged. Reattach sandpaper firmly. |
| Sander leaves swirl marks. | Applying too much pressure. Not moving the sander evenly. Akwụkwọ aja na-eyi. | Belata nrụgide. Move sander smoothly and evenly. Dochie akwụkwọ aja. |
Nkọwapụta
- Nọmba nlereanya: 2112
- Akara: Hyper siri ike
- Isi mmalite ike: Eletriki
- Ihe nkwụnye AC ugbu a: 2.4 Amps
- Grit Type: Medium (typically ships with 80 grit)
- Ibu ihe: 5 pound (ihe dị ka 2.27 n'arọ)
- Akụkụ ngwaahịa: 7 x 5 x 4.8 sentimita (ihe dịka 17.8 x 12.7 x 12.2 cm)
- Ogologo eriri: 6 ụkwụ (ihe dị ka mita 1.83)
- Ihe mkpuchi aja: Sistemụ nko-na-loop
Akwụkwọ ikike na nkwado
This product is tested and certified to look and work like new. For specific warranty information or technical support, please refer to the documentation included with your purchase or contact the manufacturer directly. Keep your purchase receipt as proof of purchase.
For further assistance, please visit the Hyper Tough websaịtị ma ọ bụ kpọtụrụ ngalaba ọrụ ndị ahịa ha.