
1. Okwu mmalite
This manual provides essential information for the safe and efficient use of your Rehau Wired Proportional Room Thermostat 230V Classic, model 269957-001. Please read these instructions carefully before installation and operation, and retain them for future reference.
2. Ozi nchekwa
Ịdọ aka ná ntị: Electrical installation should only be performed by a qualified electrician. Disconnect power before installation or maintenance to prevent electric shock.
- Ensure the power supply matches the thermostat's voltagE (230V).
- Do not expose the thermostat to moisture or extreme temperatures.
- Debe ebe ụmụaka na-apụghị iru.
- Anwala ịrụkwa unit ahụ n'onwe gị. Kpọtụrụ ndị ọrụ ruru eru.
3. Ngwaahịa gafereview
The Rehau 269957-001 is a wired proportional room thermostat designed for controlling heating systems. It provides precise temperature regulation for optimal comfort and energy efficiency.
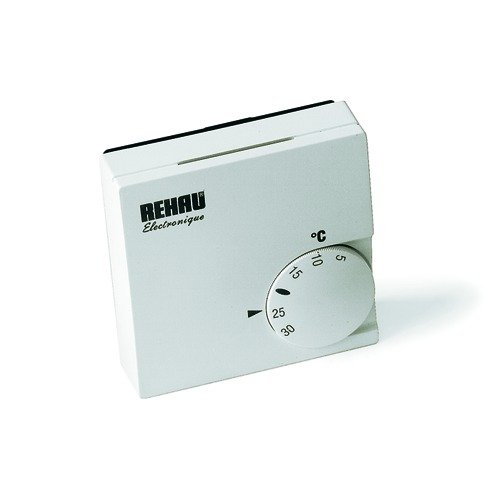
Foto 1: N'ihu view of the Rehau 269957-001 Thermostat. This image shows the main display and control interface.

Ọgụgụ 2: N'akuku view of the Rehau 269957-001 Thermostat, illustrating its compact design.
4. Ntọala na nwụnye
4.1 Ebe nrịgo
Choose a suitable location for the thermostat, typically on an interior wall, away from direct sunlight, drafts, and heat sources (e.g., radiators, lamps). The recommended height is approximately 1.5 meters (5 feet) from the floor.
4.2 Ntuziaka waya
- Kwụpụ ike: Turn off the main power supply to the heating system at the circuit breaker before beginning any wiring.
- Wepu mkpuchi: Jiri nlezianya wepụ ihe mkpuchi ihu nke thermostat ahụ.
- Jikọọ waya: Connect the 230V power supply and heating system control wires to the designated terminals. Refer to the wiring diagram provided with the product packaging for specific terminal assignments. Ensure all connections are secure.
- Secure Thermostat: Mount the thermostat base to the wall using the provided screws.
- Dochie mkpuchi: Tinyeghachi mkpuchi ihu.
- Weghachi ike: Gbanyụọ ọkụ ọkụ isi azụ.
5. Ntuziaka ọrụ
5.1 Setting the Desired Temperature
The thermostat typically features a rotary dial or up/down buttons to adjust the setpoint temperature. Rotate the dial or press the buttons to select your desired room temperature. The thermostat will then work to maintain this temperature.
5.2 Indicator Lights (if applicable)
Some models may include an indicator light to show when the heating system is active. Consult your specific model's diagram for details.
6. Nlekọta
6.1 Nhicha
Wipe the thermostat's exterior with a soft, dry cloth. Do not use abrasive cleaners or solvents, as these can damage the surface.
6.2 Ndochi Batrị (ọ bụrụ na ọdabara)
This wired thermostat does not require batteries for its primary function. If your specific model has a backup battery for settings, refer to the product packaging for replacement instructions.
7. Nchọpụta nsogbu
| Nsogbu | Ihe nwere ike ime | Ngwọta |
|---|---|---|
| Thermostat anaghị agba ọkụ | Enweghị ike ọkụ eletrik; waya na-ezighi ezi. | Check circuit breaker; verify wiring connections. |
| Sistemụ kpo oku anaghị azaghachi | Thermostat set too low; wiring issue; heating system fault. | Increase setpoint temperature; check wiring; consult heating system manual. |
| Ọgụgụ okpomọkụ ezighi ezi | Thermostat located near heat source/draft; sensor malfunction. | Relocate thermostat if possible; contact support if sensor is faulty. |
8. Nkọwapụta
- Akara: Rehau
- Nọmba nlereanya: 269957-001
- Voltage: 230 volts
- Ibu ihe: 81.65 grams
- Ụdị: Wired Proportional Room Thermostat
- Ìhè azụ: Mba
9. Akwụkwọ ikike na nkwado
For warranty information and technical support, please refer to the documentation included with your purchase or contact Rehau customer service directly. Contact details can typically be found on the manufacturer's official websaịtị.