Power Probe Professional Electrical Test Kit PPROKIT01 User Manual
Model: PPROKIT01
1. N'eluview
The Power Probe Professional Electrical Test Kit (PPROKIT01) is designed to provide comprehensive circuit testing and diagnostic capabilities. This kit includes the Power Probe III Circuit Tester and the CAT-IV 600V Hybrid Safe Digital Multimeter (PPDMM), along with various accessories to facilitate a wide range of electrical diagnostic tasks.
Figure 1.1: Power Probe Professional Electrical Test Kit PPROKIT01 with all components displayed.
Akụkụ ndị bụ isi:
Supplies Power and Ground for Functional Component Testing
CAT-IV 600V Hybrid Safe AC/DC Voltmeter
Measures Resistance to 60M Ohms
Measures Current from .001 Amps ruo 10 Amps
Measures Temperatures from -4°F to 1832°F (-20°C to 1000°C)
2. Ozi nchekwa
Always observe the following safety precautions when using the Power Probe Professional Electrical Test Kit:
Yiri nchebe anya kwesịrị ekwesị.
Ejila ngwaọrụ ahụ ma ọ bụrụ na ọ dị ka mebiri emebi.
Ensure proper insulation and avoid contact with live circuits.
Connect the tool to a power source within its specified voltage range (12V-24V DC for Power Probe III).
Zere iji ngwa na damp ma ọ bụ ọnọdụ mmiri.
Refer to the vehicle's service manual for specific electrical system information.
Ngwaahịa a nwere kemịkalụ mara steeti California na-ebute ọrịa kansa na ntụpọ ọmụmụ ma ọ bụ mmerụ ahụ ọmụmụ ọzọ.
3. Ihe ngwugwu
The Power Probe Professional Electrical Test Kit (PPROKIT01) includes the following items:
Ihe nleba anya ike nke III Circuit Tester
Power Probe Digital Multimeter (PPDMM)
Instruction Manuals for both devices
10 Amp Fuse (MMF1)
600A Fuse (PPF600)
Alligator Clip (X2) [PN024]
Probe Tip (PP3TIPBLU)
Battery Hookup (PP3EXT065)
4mm Male-Male Adapter (X2) [PNLS022]
10' Lead Black (PNLS060-BLK)
10' Lead Red (PNLS060-RED)
Test Leads for PPDMM (PPDMM-02)
K-Type Temp Probe (PPDMM-03)
AAA Batteries (3 for PPDMM)
AA Batteries (4 for Power Probe III)
Back Probe Adapter (AA5)
Figure 3.1: Kit contents organized within the protective carrying case.
4. Nhazi
4.1 Power Probe III Connection
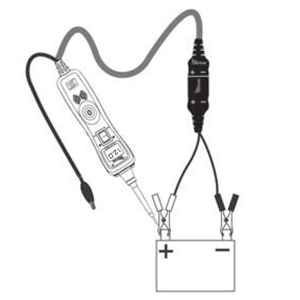
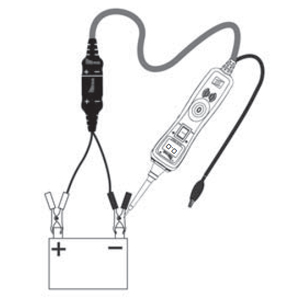
To power the Power Probe III, connect its power leads to a 12V or 24V vehicle battery. The red lead connects to the positive (+) terminal, and the black lead connects to the negative (-) terminal.
Figure 4.1: Connecting the Power Probe III to a vehicle battery for power.
4.2 PPDMM Battery Installation
The PPDMM requires three AAA batteries for operation. Open the battery compartment on the back of the multimeter and insert the batteries according to the polarity indicators. Securely close the compartment.
5. Ntuziaka ọrụ
5.1 Using the Power Probe III
The Power Probe III allows for quick testing of electrical circuits by providing power or ground to components. Once connected to a vehicle battery, the tool's tip can be used to probe circuits. The display will show voltage na-agụ.
Voltage Nnwale: Touch the probe tip to the circuit point. The LCD will display the voltage.
Power/Ground Supply: Use the rocker switch to apply battery voltage (forward) or ground (backward) to a component for functional testing. Ịkpachara anya: Ensure the component can handle direct battery voltage or ground before applying.
Nnwale na-aga n'ihu: With the tool powered, touch the probe tip to a ground source. If the circuit is continuous, the tool will indicate continuity.
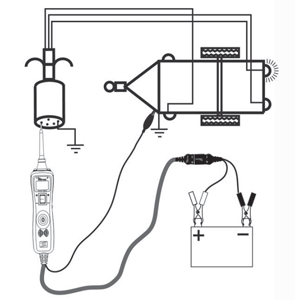
Ọgụgụ 5.1: Ọpụample of using the Power Probe III to test a circuit.
5.2 Using the PPDMM Digital Multimeter
The PPDMM is a versatile multimeter for precise measurements of voltage, resistance, current, and temperature.
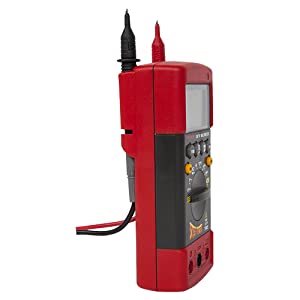
Foto 5.2: N'ihu na akụkụ views of the PPDMM, highlighting its display and input jacks.
VoltagNha eletrọniki (AC/DC):
Turn the rotary dial to the desired ACV or DCV range.
Connect the red test lead to the "VΩmA" jack and the black test lead to the "COM" jack.
Touch the probe tips to the circuit points to measure voltage.
Nledo Nguzogide:
Turn the rotary dial to the "Ω" (Ohms) range.
Connect the red test lead to the "VΩmA" jack and the black test lead to the "COM" jack.
Touch the probe tips to the component to measure resistance. Ensure the circuit is de-energized.
Ntụle ugbu a:
Turn the rotary dial to the "A" (Amps) range.
Connect the red test lead to the "10A" or "mA" jack (depending on expected current) and the black test lead to the "COM" jack.
Break the circuit and connect the multimeter in series with the circuit to measure current.
Okpu igwe:
Turn the rotary dial to the "°C/°F" range.
Connect the K-Type temperature probe to the designated jacks.
Place the tip of the temperature probe on the surface or in the medium to be measured.
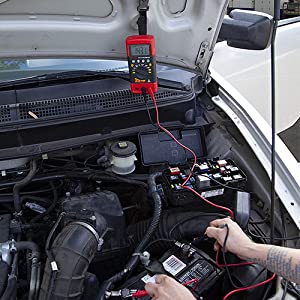
Figure 5.3: PPDMM in use for automotive electrical diagnostics.
Figure 5.4: Combined use of Power Probe III and PPDMM for comprehensive testing.
6. Nlekọta
6.1 Nhicha
Wipe the tools with a damp cloth. Do not use abrasive cleaners or solvents. Ensure the tools are dry before storage.
6.2 nnọchi batrị
Replace the AAA batteries in the PPDMM when the low battery indicator appears on the display. For the Power Probe III, ensure the vehicle battery connection is secure and providing adequate power.
6.3 Mgbanwe Fuse
If the Power Probe III or PPDMM ceases to function due to an overload, check and replace the internal fuses as per the specific instructions in their individual manuals. Always use fuses of the correct rating.
Verify red lead to positive, black lead to negative. Check vehicle battery voltage. Inspect and replace fuse if necessary.
PPDMM display is blank or dim.
Batrị dị ala ma ọ bụ nwụrụ anwụ; echichi batrị ezighi ezi.
Replace AAA batteries. Ensure batteries are inserted with correct polarity.
Inaccurate readings on PPDMM.
Incorrect measurement range selected; poor test lead connection; damaged test leads.
Select appropriate range. Ensure test leads are securely connected. Inspect test leads for damage and replace if needed.
Power Probe III does not supply power/ground.
Blown internal fuse; insufficient power from vehicle battery.
Check and replace the internal fuse. Ensure the vehicle battery is fully charged.
8. Nkọwapụta
Nọmba nlereanya: PPROKIT01
Akara: Nchọpụta ike
Isi mmalite ike: Corded Electric (Power Probe III), Battery (PPDMM)
Batrị: 3 AAA batteries required (included) for PPDMM. Power Probe III operates from vehicle 12V/24V DC.
Akụkụ ngwaahịa: 12 x 14 x 3 sentimita asatọ
Ibu ihe: 4.8 pound
Voltage Ntụ: CAT-IV 600V AC/DC
Nledo Nguzogide: Up to 60M Ohms
Ntụle ugbu a: 0.001 Amps ruo 10 Amps
Okpu igwe: -4°F ruo 1832°F (-20°C ruo 1000°C)
Ụbọchị mbụ dị: Julaị 29, 2015
9. Akwụkwọ ikike na nkwado
For warranty information, technical support, or service inquiries, please refer to the specific warranty documentation included with your product or visit the official Power Probe websaịtị. Debe nnata nzụta gị ka ihe akaebe nke ịzụrụ.
Onye nrụpụta: Nchọpụta ike
Kpọtụrụ: Tụtụ aka na Power Probe Store on Amazon or the official Power Probe websaịtị maka akụrụngwa nkwado.
Ask a question about this manual
Ask about setup, troubleshooting, compatibility, parts, safety, or missing instructions. Manuals+ will review the question and use this page’s manual context to help answer it.