
1. Okwu mmalite
The Mastech MS6612 is a digital luxmeter designed for measuring illuminance. It features a large LCD display with backlight and a bar graph for easy reading. This device offers automatic and manual range switching, data hold, peak value measurement, relative value measurement, and zero calibration functions. It is capable of measuring up to 200,000 Lux or 20,000 Foot-Candles (Fc).
2. Ozi nchekwa
Biko gụọ ma ghọta ntuziaka nchekwa niile tupu ị rụọ ọrụ ngwaọrụ ahụ. Ọ bụrụ na ị gbasoghị ntuziaka ndị a, o nwere ike ibute mmerụ ahụ ma ọ bụ mmebi na mita ahụ.
- Do not operate the meter in environments with explosive gas, vapor, or dust.
- Avoid exposing the meter to extreme temperatures or high humidity.
- Remove batteries if the meter is not used for an extended period to prevent leakage.
- Do not attempt to repair or modify the meter. Refer all servicing to qualified personnel.
- Debe mita ahụ ọcha wee kpọọ nkụ.
3. Ngwaahịa gafereview
The Mastech MS6612 Digital Luxmeter consists of a main unit with an LCD display and control buttons, and a silicon photoelectric diode sensor for light detection.
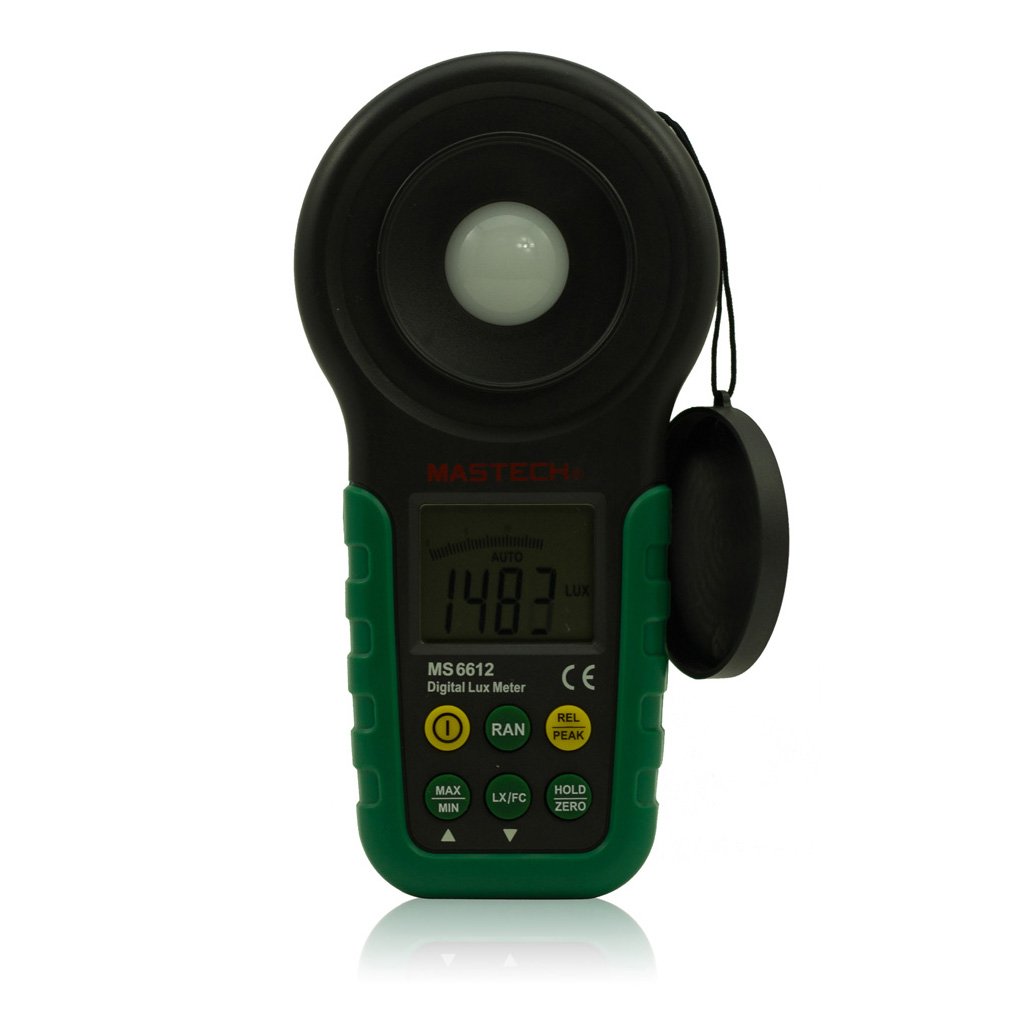
Foto 1: N'ihu view of the Mastech MS6612 Digital Luxmeter. This image shows the main body of the device, including the large LCD screen, control buttons, and the light sensor located at the top.
Isi ihe:
- Ngosipụta LCD: 3½ digits with analog bar display for clear readings.
- bọtịnụ njikwa: For various functions such as power, range, hold, peak, relative, zero, unit conversion, and mute.
- Ihe mmetụta ọkụ: Silicon photoelectric diode for accurate light measurement.
- Akụkụ batrị: Dị n'azụ maka batrị 9V.
4. Nhazi
4.1 Ntinye batrị
- Chọta ebe mkpuchi batrị n'azụ mita.
- Use a screwdriver (if necessary) to open the battery compartment.
- Insert one 9V (IEC 6LR61) battery, observing the correct polarity (+/-).
- Dochie mkpuchi nchekwa batrị ma chekwaa ya.
Note: A low battery indicator will appear on the display when the battery needs replacement.
5. Ntuziaka ọrụ
5.1 Gbanyụọ ma ọ bụ gbanyụọ
- Pịa IKE bọtịnụ iji gbanye mita ahụ.
- Pịa IKE button again to turn the meter off.
- The meter features an automatic power-off function, which will turn off the device if no keys are operated for more than 10 minutes.
5.2 Nha Isi
- Gbanwuo mita.
- Point the light sensor towards the light source to be measured.
- The illuminance value will be displayed on the LCD. The meter automatically selects the appropriate range.
5.3 Range Switching (Auto/Manual)
The MS6612 supports both automatic and manual range switching.
- In auto-ranging mode, the meter automatically selects the best measurement range.
- Pịa RANGE button to switch between auto and manual ranging modes. In manual mode, you can cycle through available ranges.
- If the measured value exceeds the current range in manual mode, the LCD will display "OL" (Overload).
5.4 Data Jide Ọrụ
Iji mee ka ihe dị ugbu a dị na ihuenyo ahụ gbụchie:
- Pịa Jide button. The "HOLD" indicator will appear on the display.
- Pịa Jide bọtịnụ ọzọ iji hapụ njide data ma malitegharịa nha dị ndụ.
5.5 Maximum/Minimum Value Measurement
Iji view the maximum or minimum illuminance recorded during a measurement session:
- Pịa MAX/MIN button. The display will show the maximum recorded value.
- Pịa MAX/MIN again to cycle to the minimum recorded value.
- Pịa MAX/MIN a third time to exit this mode and return to live measurement.
5.6 Peak Value Measurement
This function captures the highest instantaneous illuminance value.
- Pịa Ọnụ ọgụgụ kasị elu button to activate peak measurement. The "PEAK" indicator will appear.
- The display will show the highest illuminance detected since activating the function.
- Pịa Ọnụ ọgụgụ kasị elu ọzọ ka ịpụ na ọnọdụ a.
5.7 Relative Value Measurement
This function allows you to set a reference point and measure the difference from that point.
- In a stable light environment, press the REL button. The current reading becomes the reference, and the display will show "0".
- Subsequent measurements will show the difference (positive or negative) from this reference value.
- Pịa REL again to exit relative measurement mode.
5.8 Zero Calibration Function
To ensure accuracy, especially in low light conditions, perform a zero calibration.
- Place the light sensor in a completely dark environment (e.g., cover it with an opaque cap).
- Pịa ZERO button. The display should read "0.00".
- This calibrates the meter to account for any residual sensor output in darkness.
5.9 Unit Conversion (Fc/Lux)
The meter can display measurements in Lux or Foot-Candles (Fc).
- Pịa UNIT button to toggle between Lux and Fc units.
- The selected unit will be indicated on the LCD.
- Ntughari: 1 Fc = 10.764 Lux; 1 Lux = 0.09290 Fc.
5.10 Touch Tone and Mute Function
The meter may emit a touch tone when buttons are pressed. This can be muted.
- Refer to the specific button on your device for muting the touch tone.
6. Nlekọta
6.1 Nhicha
- Hichapụ mita ahụ casing jiri nwayọ, damp akwa . Ejila ihe nchacha abrasive ma ọ bụ ihe mgbaze.
- Keep the light sensor clean and free from dust or smudges to ensure accurate readings. Use a soft, lint-free cloth.
6.2 nnọchi batrị
Replace the 9V battery when the low battery indicator appears on the display. Follow the steps in Section 4.1 for battery installation.
6.3 Nchekwa
- If storing the meter for an extended period, remove the battery to prevent leakage and potential damage.
- Store the meter in a cool, dry place, away from direct sunlight and extreme temperatures.
7. Nchọpụta nsogbu
| Nsogbu | Ihe nwere ike ime | Ngwọta |
|---|---|---|
| Mita ahụ anaghị agba ọkụ. | Batrị nwụrụ anwụ ma ọ bụ arụnyere na ezighi ezi. | Check battery polarity, replace battery. |
| "OL" displayed on screen. | Measurement value exceeds current range (manual mode). | Switch to a higher range or enable auto-ranging. |
| Ọgụgụ na-ezighi ezi. | Dirty sensor, uncalibrated zero, or incorrect range. | Clean sensor, perform zero calibration, ensure correct range. |
| Ihe ngosi batrị dị ala. | Ike batrị dị ala. | Dochie batrị 9V. |
8. Nkọwapụta
| Oke | Uru |
|---|---|
| Ogo nha | 20, 200, 2000, 20000, 200000 Lux 20, 200, 2000, 20000 Fc |
| Ngosipụta | 3½ digits, max reading of 1999, with analog bar display |
| Sensọ | Silicon photoelectric diode |
| Measured Spectral Range | 320 ~ 730nm |
| SampỌnụ ego | ≥2 times/s |
| Okpomọkụ na-arụ ọrụ | -10~50 °C, max 80% RH (Non-Condensed) |
| Okpomọkụ nchekwa | -10~50 °C, max 80% RH (Non-Condensed, removing batteries) |
| Environment na-arụ ọrụ | Ojiji ime ụlọ |
| Ogologo | 2000m highest |
| Ịnye ọkụ | 1 x 9V, IEC 6LR61 battery |
| Ndụ batrị | Ihe ruru. awa 200 |
| Akụkụ (HxWxD) | 190 mm x 89 mm x 42.5 mm (7.48 x 3.50 x 1.67 inch) |
| Ibu (na-enweghị batrị) | Ihe ruru. 360 g (12.7 oz) |
| Ibu (ya na batrị) | Ihe ruru. 420 g (14.8 oz) |
Illuminance Unit Conversion:
- 1 Foot-Candle (Fc) = 10.764 Lux
- 1 Lux = 0.09290 Foot-Candle (Fc)
9. Akwụkwọ ikike na nkwado
Mastech products are designed for reliability and performance. For specific warranty information, please refer to the warranty card included with your purchase or visit the official Mastech website. For technical support or service inquiries, please contact Mastech customer service through their official channels.
Biko jikwaa nnata nzụta gị dị ka ihe akaebe nke ịzụrụ ihe maka ebubo akwụkwọ ikike.