
1. Okwu mmalite
This manual provides essential instructions for the installation, operation, and maintenance of your Westfalia 305330300113 Electric Kit for Trailers. This kit is designed to provide the necessary electrical connections between your vehicle and a trailer, ensuring proper functioning of trailer lights and other electrical systems. Please read this manual thoroughly before installation and use to ensure safety and optimal performance.
2. Ntuziaka nchekwa
Always prioritize safety during installation and operation. Failure to follow these instructions may result in injury, damage to the product, or damage to your vehicle.
- Akwadoro nwụnye ọkachamara: N'ihi mgbagwoju anya nke sistemu eletriki ụgbọala, a na-atụ aro nke ukwuu ka onye ọkachamara ruru eru tinye ya n'ọrụ ọkachamara.
- Kwụpụ ike: Before beginning any electrical work, always disconnect the vehicle's battery to prevent electrical shock or short circuits.
- Jiri Ngwa ziri ezi: Ensure you use appropriate tools for electrical work to avoid damage to components or injury.
- Check Wiring Diagrams: Always refer to the latest official Westfalia wiring diagrams and your vehicle's specific wiring diagrams. Note: Some older diagrams may contain errors. Always verify with the manufacturer's most current documentation.
- Njikọ echekwara Ensure all electrical connections are secure, insulated, and protected from moisture and abrasion.
- Nwalee nke ọma: After installation, test all trailer lighting and electrical functions before driving.
3. Ihe ngwugwu
Please verify that all components are present and undamaged before beginning installation. The Westfalia 305330300113 Electric Kit typically includes:
- Isi eriri eriri
- Control unit/module
- Socket for trailer connection (e.g., 7-pin or 13-pin)
- Mounting hardware (screws, cable ties)
- Akwụkwọ ntuziaka (akwụkwọ a)
- Additional cables or adapters as required for specific vehicle models
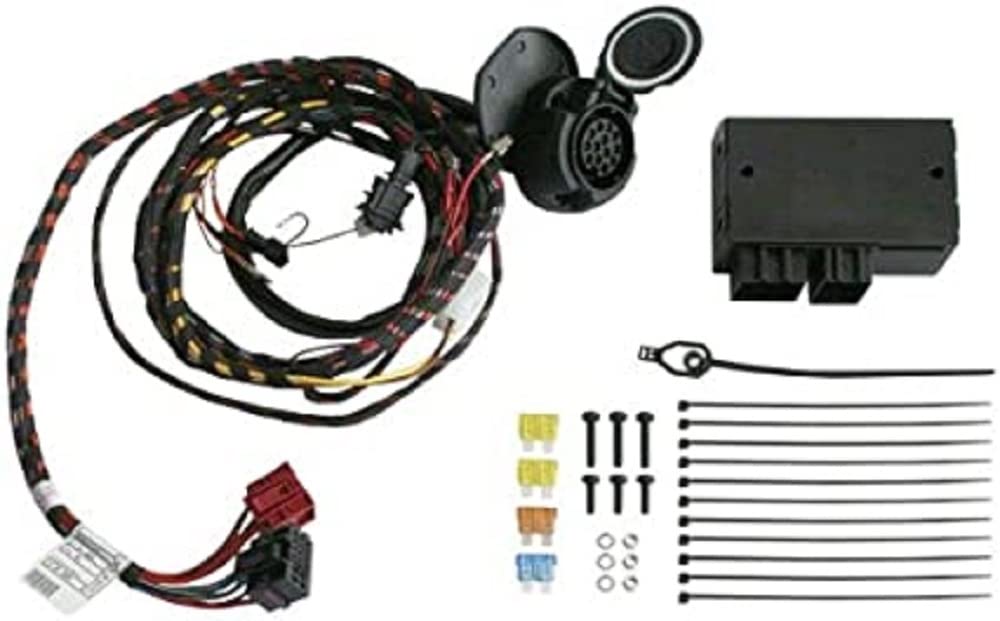
Image showing the Westfalia 305330300113 electric kit components, including wiring harnesses and connectors.
4. Ntọala na nwụnye
This section outlines the general steps for installing the electric kit. Specific details will vary based on your vehicle model. Always consult your vehicle's service manual and the detailed wiring diagrams provided by Westfalia.
- Nkwadebe ụgbọ ala:
- Debe ụgbọala ahụ n'ebe dị larịị ma tinye brek ebe a na-adọba ụgbọala.
- Kwupu njikọ na-adịghị mma nke batrị ụgbọ ala.
- Access the rear of the vehicle, typically behind the bumper or inside the trunk/boot area, where the trailer hitch and wiring will be installed.
- Mounting the Control Unit:
- Locate a suitable, dry, and secure mounting position for the control unit, away from excessive heat or moisture.
- Secure the control unit using the provided mounting hardware.
- Connecting the Wiring Harness:
- Follow the Westfalia wiring diagram precisely to connect the main harness to the vehicle's existing electrical system. This typically involves connecting to tail lights, brake lights, turn signals, and a power source.
- Ensure all connections are made using appropriate connectors (e.g., crimp connectors, solder, or vehicle-specific plugs).
- Route the wiring safely, away from moving parts, sharp edges, and heat sources. Use cable ties to secure the harness.
- Installing the Trailer Socket:
- Mount the trailer socket (e.g., 7-pin or 13-pin) in a convenient and protected location near the trailer hitch.
- Connect the wires from the main harness to the corresponding pins on the trailer socket, following the wiring diagram. Pay close attention to pin assignments.
- Final Checks and Testing:
- Once all connections are made, double-check all wiring against the diagram.
- Jikọọ batrị ụgbọ ala.
- Connect a trailer or a trailer light tester to the newly installed socket.
- Test all functions: turn signals (left/right), brake lights, tail lights, reverse lights, and any auxiliary power.
- Ensure all lights operate correctly and without flickering or errors.
Ihe ndetu dị mkpa: Onye ahịa review indicated a potential error in an older wiring diagram. Always use the most current wiring diagram provided by Westfalia or consult their official support channels for the latest information.
5. Ntuziaka ọrụ
Using your Westfalia electric kit is straightforward once installed correctly.
- Ijikọ Trailer:
- Ensure both the vehicle and trailer are stationary and secure.
- Align the trailer's electrical plug with the vehicle's trailer socket.
- Push the plug firmly into the socket until it clicks or is securely seated.
- Verify the connection is tight and free from debris.
- Checking Trailer Lights:
- Before driving, always perform a visual check of all trailer lights: tail lights, brake lights, and turn signals.
- Have an assistant confirm the lights are working correctly as you operate them from the vehicle's cabin.
- Ịkwụsị ihe ndọta ụgbọala:
- Ensure both the vehicle and trailer are stationary and secure.
- Carefully pull the trailer's electrical plug straight out from the vehicle's socket. Avoid pulling by the wires.
- Store the vehicle's trailer socket cover (if applicable) to protect it from dirt and moisture.
6. Nlekọta
Regular, simple maintenance can extend the life of your electric kit and ensure reliable operation.
- Nyochaa njikọ: Periodically check all wiring connections for corrosion, fraying, or looseness.
- Socket dị ọcha: Keep the trailer socket clean and free of dirt, dust, and moisture. Use a non-conductive contact cleaner if necessary.
- Lubricate Pins: Apply a small amount of dielectric grease to the socket pins to prevent corrosion and ensure good contact.
- Lelee maka mmebi: Inspect the control unit and wiring harness for any physical damage. Replace damaged components immediately.
7. Nchọpụta nsogbu
If you encounter issues with your electric kit, refer to the following common problems and solutions:
| Nsogbu | Ihe nwere ike ime | Ngwọta |
|---|---|---|
| Ọkụ ụgbọala na-adọkpụ anaghị arụ ọrụ |
|
|
| Specific trailer light not working (e.g., brake light) |
|
|
| Njikọ na-adịte aka |
|
|
If these steps do not resolve the issue, contact Westfalia customer support or a qualified automotive electrician.
8. Nkọwapụta
| Njirimara | Nkọwa |
|---|---|
| Nọmba nlereanya | 305330300113 |
| Ụdị | Westphalia |
| Akụkụ ngwaahịa | 20 x 19 x 7 cm |
| Ibu Ibu | 770 g |
| Ihe onwunwe | Ọla |
| Servicedị Ọrụ hicgbọ | Ụlọ moto |
| Ụdị ụgbọ ala dakọtara | Ụlọ moto |
| Ụdị mmecha | Electrostatic paint |
| Nọmba Azụmahịa zuru ụwa ọnụ (GTIN) | 04250141184992 |
9. Akwụkwọ ikike na nkwado
Westfalia products are manufactured to high-quality standards. For warranty information, technical support, or to obtain the latest wiring diagrams, please contact Westfalia-Automotive GmbH directly through their official website or customer service channels. Keep your proof of purchase for warranty claims.
Onye nrụpụta: Westfalia-Automotive GmbH
Product in Amazon.es since: Julaị 2, 2013