
1. Okwu mmalite
This manual provides essential instructions for the safe and efficient operation of your Sharp CD-DH950P 240W Mini-Component System. This system features a 5-disc CD changer, a cassette deck, an iPod/iPhone docking station, a USB host for digital audio playback, and an AM/FM tuner. Please read this manual thoroughly before using the system and retain it for future reference.
2. Ozi nchekwa
- Isi mmalite ike: Connect the unit only to an AC outlet of the specified voltage.
- Igwe ikuku: Hụ na ikuku na-abata nke ọma. Ekpuchila oghere ikuku.
- Mmiri na mmiri: Do not expose the unit to rain, moisture, or dripping/splashing liquids.
- Okpomọkụ: Keep the unit away from heat sources such as radiators, heat registers, stoves, or other apparatus that produce heat.
- Nhicha: Unplug the unit from the wall outlet before cleaning. Use a soft, dry cloth.
- Ije ozi: Anwala ịnye ngwaahịa a n'onwe gị. Tụtụ aka n'aka ndị ọrụ ruru eru.
3. Ihe ngwugwu
Chọpụta na ngwungwu gị nwere ihe ndị a:
- Main Unit (CD-DH950P)
- Ọkà okwu akaekpe
- Ọkà okwu ziri ezi
- Eji batrị dị anya njikwa
- AM Loop Antenna
- FM Waya Antenna
- Ụdọ ọkụ
4. Nhazi
4.1 Ijikọ Ndị Ọkà Okwu
Connect the speaker wires from the main unit to the corresponding terminals on the back of each speaker. Ensure correct polarity (red to red, black to black) for optimal sound quality. The left speaker connects to the left speaker output, and the right speaker to the right speaker output.
4.2 Connecting the Antennas
- Antenna FM: Connect the supplied FM wire antenna to the FM antenna terminal on the rear of the main unit. Extend the wire for better reception.
- Antenna AM: Connect the supplied AM loop antenna to the AM antenna terminals on the rear of the main unit. Position the antenna for best reception.
4.3 Njikọ ike
Plug the power cord into the AC IN jack on the rear of the main unit, then plug the other end into a standard AC wall outlet.
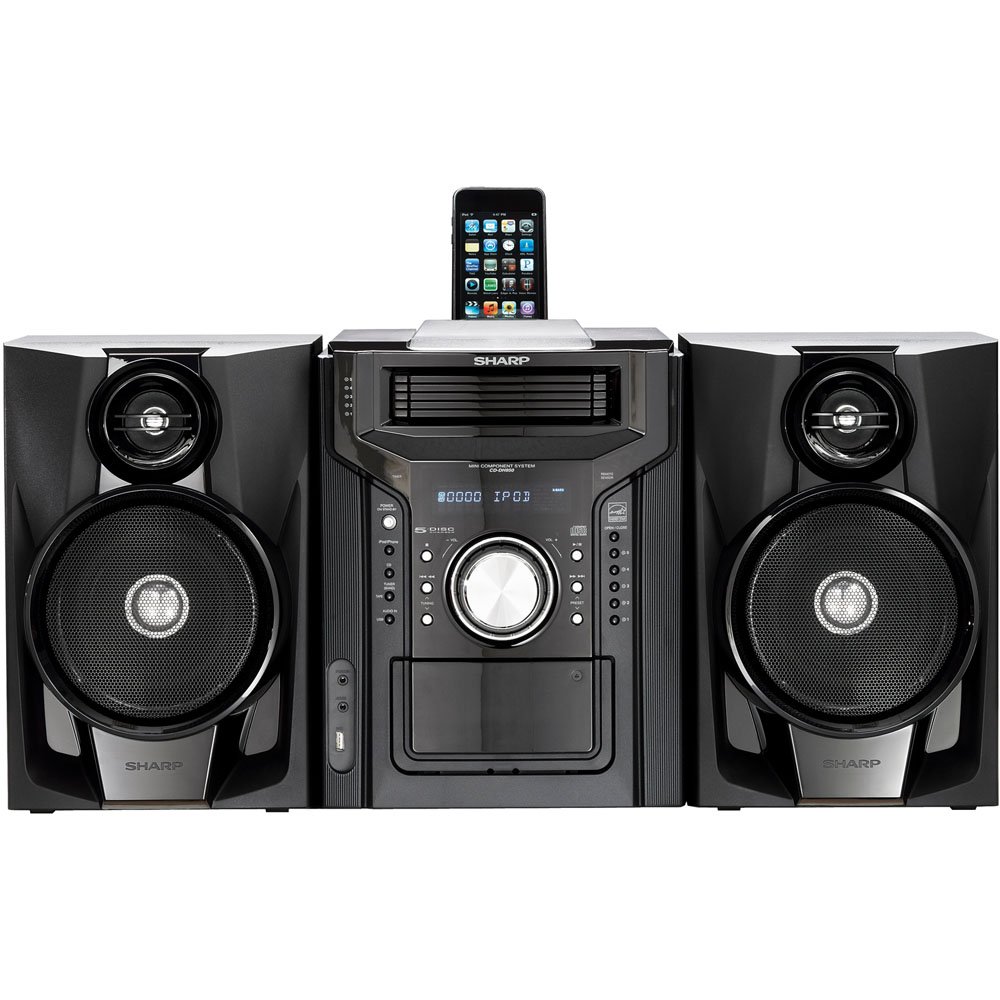
Ọgụgụ 4.3.1: N'ozuzu view of the Sharp CD-DH950P Mini-Component System, showing the main unit flanked by two speakers, with an iPhone docked on top of the main unit.
5. Ntuziaka ọrụ
5.1 Gbanyụọ/ Gbanyụọ na njikwa olu
- Pịa IKE bọtịnụ dị na panel ihu ma ọ bụ njikwa ime obodo iji gbanye ma ọ bụ gbanyụọ ngwaọrụ ahụ.
- Tugharia ihe Mpịakọta jiri bọtịnụ dị na panel ihu ma ọ bụ jiri bọtịnụ ahụ Vol +/- bọtịnụ dị na njikwa dịpụrụ adịpụ iji gbanwee ọkwa ụda.
5.2 CD ịkpọghachi
This system features a 5-disc CD changer.
- Pịa Mepee/mechie bọtịnụ imepe tray CD.
- Place up to five CDs on the disc trays, label side up.
- Pịa Mepee/mechie ọzọ imechi tray.
- Pịa CD bọtịnụ iji họrọ ọrụ CD ahụ.
- Pịa KWURU/Kwụsịa bọtịnụ ka ịmalite ịkpọghachi.
- Jiri ihe MAKA buttons to navigate between tracks or discs.
5.3 Ọrụ nke Kaseti Dek
- Pịa TAPE OPEN/CLOSE button to open the cassette deck.
- Fanye teepu cassette.
- Pịa TAP. button to select the cassette function.
- Pịa KWURU ibido playback.
- To record, ensure the source is selected (e.g., CD, Tuner) and press the Dekọọ button on the cassette deck.
5.4 iPod/iPhone Docking
The system includes a top-mounted docking slot for compatible iPod and iPhone devices (30-pin connector).
- Carefully place your iPod or iPhone into the docking slot.
- The system will automatically switch to iPod/iPhone mode or you may need to press the iPod/iPhone bọtịnụ.
- Use the system's controls or your device's controls to play music. The device will also charge while docked.
5.5 USB Host Playback
Connect a USB storage device containing MP3 or WMA audio files to the USB port on the front panel.
- Fanye ngwaọrụ USB n'ọdụ ụgbọ mmiri USB.
- Pịa USB button to select the USB function.
- Jiri njikwa egwuregwu iji gaagharị ma kpọọ egwu files.
Ihe ngosi 5.6 nke ụtụtụ/FM
- Pịa EGO button to select AM or FM radio.
- Jiri ihe NKWUKWU +/- bọtịnụ iji hazie ọdụ aka.
- To auto-scan, press and hold the NKWUKWU +/- bọtịnụ.
- To store a preset, tune to the desired station, then press Ncheta followed by a preset number.
5.7 Ntinye ọdịyo
Connect an external audio device (e.g., MP3 player, smartphone) to the AUDIO IN jack on the front panel using a 3.5mm stereo cable.
- Connect your device to the AUDIO IN jack.
- Pịa AUDIO n'ime button to select this source.
- Jikwaa ịkpọgharị n'ime ngwaọrụ gị ejikọrọ.
6. Nlekọta
6.1 Na-ehicha ngalaba ahụ
Wipe the exterior of the unit with a soft, dry cloth. Do not use abrasive cleaners, waxes, or solvents. Ensure the unit is unplugged before cleaning.
6.2 Nlekọta CD na Kaseti
- Handle CDs by their edges to avoid fingerprints and scratches. Clean discs with a soft, lint-free cloth from the center outwards.
- Store cassette tapes away from strong magnetic fields and direct sunlight.
7. Nchọpụta nsogbu
| Nsogbu | Ihe nwere ike ime | Ngwọta |
|---|---|---|
| Enweghị ike | Ejikọghị eriri ọkụ eletrik; Ọkpọ ọkụ eletrik nwere nsogbu | Hụ na e tinyere eriri ọkụ eletrik n'ime ya nke ọma; Nwaa oghere ọzọ |
| Enweghị ụda | Volume too low; Speakers not connected; Incorrect source selected | Increase volume; Check speaker connections; Select correct input source |
| CD anaghị egwu | Disc inserted incorrectly; Disc is dirty or scratched | Insert disc correctly (label side up); Clean or replace disc |
| Nnabata redio adịghị mma | Antenna not positioned correctly; Weak signal | Adjust position of AM/FM antennas; Try auto-tuning or manual fine-tuning |
| iPod/iPhone not charging/playing | Device not properly docked; Device not compatible (e.g., newer connector) | Re-dock the device; Note that this system uses a 30-pin connector, newer devices may require an adapter (not included) |
8. Nkọwapụta
- Akara: Nkọ
- Ụdị: CD-DH950P
- Mgbakọta Ike Mbupute: 240 Watts RMS (85W/ch FTC)
- Nhazi Ọkà Okwu: 2.1 Ọwa
- Ụdị ọdịyo akwadoro: CD, MP3, WMA
- Algbaàmà-na-Noise ruru: 100 dB
- Ngwa dakọtara: MP3 Player, Smartphone (via 30-pin dock or USB/Audio In)
- Akụkụ (L x W x H): 27.6 x 13.6 x 13.5 sentimita asatọ
- Ibu ihe: 24.4 pound
- UPC: 074000369863, 074000369290
9. Akwụkwọ ikike Ozi
This product is covered by a 1-year limited warranty from the date of purchase. Please refer to the warranty card included with your product for full terms and conditions, or contact Sharp customer service for details.
10. Nkwado
For further assistance, technical support, or service inquiries, please contact Sharp customer service. Contact information can typically be found on the Sharp official websaịtị ma ọ bụ na akwụkwọ enyere na ngwaahịa gị.